Windows

How do I delete a Printer Driver in Windows 7?

Posted by Andy on February 14, 2010
Tech Tips, Windows / Comments Off on How do I delete a Printer Driver in Windows 7?

Windows 7 has some great features, but some things are very different from what you may be used to.  Mirosoft has strived to extract the user from things like driver installations and other technical tasks so that “things just work”.  A fantastic goal, but the reality of Windows is that as an operating system that serves the enterprise, all of the complex underlying tasks that most users don’t need or want to know about still need to be accessible to  technicians.

Once such task is printer driver installation and removal.  Windows 7 is really good at recognizing new devices like printers, cameras and mobile devices and for the most part will find the correct driver for the device, add it and you are off to the races without a hitch.  What if the device is not recognized or the wrong driver is loaded?  In previous Windows versions you would just bring up the Device Manager, go to the properties of the device in question, go to the driver tab and remove the incorrect driver before installing the new one.  In Windows 7 it is more complicated than that. 

When you want to remove a printer driver in Windows 7, you need to remove the driver from associating with the printer, but you also need to remove the driver from the machine. 

First, remove the printer/driver association.  This is what you would expect – remove the driver from the properties of the printer.  Go to Start, then Devices and Printers. Right click on the printer in question and click “remove device”.  This will uninstall the printer, but not the driver. 

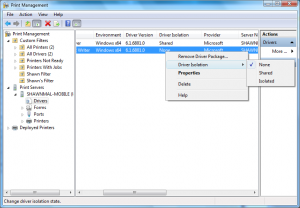
To uninstall the printer driver, go to Start then Control Pannel.  Once in Control Pannel click on System and Security.  From there, click on Administrative Tools.  In Administrative Tools, click on Print Management to bring up the Print Management Console (PMC).  Click on All Drivers to see what print drivers are installed.  To uninstall a driver,  just right click on the driver and choose “Remove Driver Package”. 

The PMC is actually a great tool that is used not only to manage local printers and drivers, but also print servers in the enterprise.  There are a lot of great features introduced in Windows 7 for printer management that do a lot to improve management of printers, ease driver deployment and protect the print servers from bad drivers.  You can run drivers in Driver Isolation mode which will isolates the driver into a separate process so that if it crashes, is doesn’t take down the rest of the print system.  ACL’s can be managed form the PMC too – much needed improvement.
Tags: ,

GodMode.{ED7BA470-8E54-465E-825C-99712043E01C} in Windows 7

Posted by Andy on January 06, 2010
Tech Tips, Windows / Comments Off on GodMode.{ED7BA470-8E54-465E-825C-99712043E01C} in Windows 7

This has been floating around for a bit, but here it is.  This is a little hack for Widows 7 that puts a bunch of administrative functions all in one place.  Very useful for tweaking Window 7.

All you need to to is to create a folder anywhere you want, then rename it to “GodMode.{ED7BA470-8E54-465E-825C-99712043E01C}”.  That’s it.  Bask in the glory of Power!

Folder Icon - Looks like Control Pannel

Folder Icon - Looks like Control Pannel

FEEL THE POWER!!!

FEEL THE POWER!!!

Tags: ,

How to boot in Safe Mode

Posted by Andy on December 01, 2009
Anti-Virus, Tech Tips, Windows / Comments Off on How to boot in Safe Mode

If you are fighting a virus/malware on your computer, it is best to boot in safe mode before you start removing things and running scans.  If you don’t, it is likely that the malware will likely just re-install itself.  I’m not going to go into a whole tutorial on virus fighting (maybe in a future post) but the basics are as follows:

1) As soon as you notice you are infected, unplug your internet connection or turn off your wireless.  This will prevent the infection from spreading, and will isolate the offending program from its source.

2) Boot into Safe Mode

3) Run your favorite antivirus/anti-malware program.

This post is really about Safe Mode – how do you get there?  There are a couple of ways depending on the operating system you are using.  Here’s the Microsoft Page on the topic.

Windows XP

If XP is the only operating system installed on your computer, boot into Safe Mode with these instructions.

  • If the computer is running, shut down Windows, and then turn off the power
  • Wait 30 seconds, and then turn the computer on.
  • Start tapping the F8 key. The Windows Advanced Options Menu appears. If you begin tapping the F8 key too soon, some computers display a “keyboard error” message.  If this happens, resstart the computer and try again.
  • Ensure that the Safe mode option is selected.  If you are trying to clean a machine that is virus laden, choose Safe Mode Without Networking.
  • Press Enter. The computer then begins to start in Safe mode.
  • When you are finished with all troubleshooting, close all programs and restart the computer as you normally would.

If you don’t want to bother with function keys, you can use the System Configuration Utility method.

  • Close all open programs.
  • Click Start, Run and type MSCONFIG in the box and click OK
  • The System Configuration Utility appears, On the BOOT.INI tab, Check the “/SAFEBOOT” option, and then click OK and Restart your computer when prompted.
  • The computer restarts in Safe mode.
  • Perform the troubleshooting steps for which you are using Safe Mode.
  • When you are finished with troubleshooting in Safe mode, open MSCONFIG again, on the BOOT.INI tab,  uncheck “/SAFEBOOT” and click OK to restart your computer.  THIS STEP IS CRITICAL.  If you don’t change this back, then the computer will continue to boot in Safe Mode until you do.

Windows 7

Safe Mode in Windows 7 is basically the same as XP – use F8 to get to the Safe Mode startup screen.  MSCONFIG is slightly different – Safe Mode is called Safe Boot, but otherwise the process is the same.

Tags: , ,

Windows Security Essentials – worth it?

Posted by Andy on September 29, 2009
Security, Tech Tips, Windows / Comments Off on Windows Security Essentials – worth it?

I think so – especially for home and small business users.  What is it?  MSE or Microsoft Security Essentials is MSFT’s free antivirus software (previously, this was Windows Forefront) for home users.  It’s not enterprise class since it has no consolidated reporting or node management software, but is great for homes and small businesses.  It’s free – did I mention that?

I’ve put this on a Windows 7 laptop and have only had a couple of days to evaluate it, but so far it is very nice.  Low on resources, unobtrusive, and thorough.  Oh, and it passed the August VB tests.  I don’t subscribe to the VB reports, but you can register for free here and see the VB100 results.  This is a list of Anti-Virus vendors that pass a series of tests designed by Virus Bulletin to see how well the protect your computer.  The VB100 logo is a certification that the software does what it is supposed to do.

I’m a big fan of anything that adds hassle free virus protection for people, and I hope this is packaged with Windows soon.  I know that will create all kinds of licensing issues with the AV vendors who have third party deals with resellers to package their software with Windows, but I think people need AV protection and it should be free.  Especially from Microsoft, since IE and Windows are such huge sources/targets for the virus writers, Microsoft has an obligation to provide free and comprehensive virus protection, and I’m very pleased that they are stepping up to the plate.

Tags:

WPA-TKIP vs WPA-AES

Posted by Andy on September 05, 2009
Security, Windows / Comments Off on WPA-TKIP vs WPA-AES

More on Wireless security.

As I posted recently, WPA is the security method you should be using on your wireless network.  But what flavor?  TKIP? AES?  Well well, if it isn’t more acronyms to confuse the matter.

The short answer is you should be using WPA2-AES.

To understand this we need a short history lesson.  When WPA was released in 2003 to address WEP’s weakness, it was released as a stop gap until the 802.11i standard for encryption was released.  WPA was much better than WEP, and included TKIP or Temporal Key Integrity Protocol.  The main advantage of TKIP is that is changes the encryption key with each data transmission making cracking the key extremely difficult.

WPA2 was released in 2004 and replaces WPA, but is not compatible with older routers and wireless cards.  WPA2 includes AES or Advanced Encryption Standard.  Basically, AES is hardware driven and TKIP is software driven, which is why AES is not compatible with older hardware – they can’t handle the load.  The encryption method for AES, CCMP, is better than TKIP which uses RC4 encryption.  I’m not a security expert and I wont pretend to understand the algorithms, but it is clear that AES with CCMP is more secure than TKIP.

For more information on these topics here are a couple of links:

802.11 Wiki

WI-FI Alliance FAQ

Outlook 2007 tips

Posted by Andy on August 13, 2009
Outlook, Tech Tips, Windows / 1 Comment

While I’m on the subject of tips, here are a few tips for Outlook 2007.

1) Stop Outlook from suggesting names in the TO field.

This is related to the .nk2 file I blogged about awhile ago.  If you don’t like that outlook suggests names for you, then you can turn this off.  Go to Tools, then Options.  From there choose the Preferences tab, then click the e-mail options button.  In the e-mail options dialog, click the Advanced E-mail Options button.  Uncheck the radio button for “Suggest names while completing To, Cc, and Bcc fields”.  Click “ok”.

2) Configure Outlook to NEVER send read receipts.

Personally, I think read receipts are annoying.  Some people love them, and who am I to judge, but I’d prefer to keep when I read your mail to myself, so I turn this “feature” off.  To do this, go to Tools, then Options.  From there choose the Preferences tab, then click the E-mail options button.  In the E-mail options window, choose the “Tracking Options” button.  Look for “Use this option to decide how to respond to requests for read receipts. Only applies to Internet Mail accounts.”   There are a couple of radio buttons – choose “never send a response”.  Click “ok”.

3) Remove the System Tray icon for new email

Another love it or hate it item.  I like this one, but when the system tray gets cluttered, out it goes.  To remove the icon, once again go to Tools, Options and from there choos the Preferences tab.  On the Preferences tab choose the E-mail Options button.  In the E-mail options dialog choose the Advanced E-mail Options button.  Under the “When new items arrive in My Inbox”, uncheck “Show an envelope icon in the notification area”.  Click “ok”.

4) Configure Outlook to empty the deleted items folder when you exit.

This is really helpful if you have limited mailbox space.  Deleted items count toward your mailbox space limits, so you either need to remember to empty your deleted items, or have outlook do it for you when you exit the application.

To configure Outlook to empty deleted items on exit, go to Tools, the Options, then choose the “Other” tab.  Under “General”, check “Empty the Deleted Items folder upon exiting”.  Click “ok”.  Your sysadmin will love you ;)

5) Add Holidays to your Calendar

Outlook support iCal, so there are thousands of calendars you can add to Outlook.  To add holidays from the default list, go to Tools then Options, then choose the Preferences tab.  In the Calendar section, click the Calendar Options button.  In the Calendar Options window, click the “Add Holidays” button.  Scroll through the resulting list, click the radio button next to the ones you want, then click “ok”.

Just a few things for now.  I’ll add more another time.

Tags:

10 Windows 7 Tips

Posted by Andy on August 13, 2009
Cool Tech, Tech Tips, Windows / Comments Off on 10 Windows 7 Tips

So far, Windows 7 is the bee’s knees.  The more I find out, the more I like, which is saying a lot – with operating systems, it’s usually the other way around!

Here are a few things that make Windows 7 neat.  Big thanks to Tim Sneath for most of these.

1) Windows Management – in XP, your choices on what you could do with arranging windows on your screen was somewhat limited.  You could maximize a window to take the whole screen, you could manually shrink it to the size you wanted and move it to the side, iconize it, etc.  In Windows 7, several “docking” features were introduced that make moving things around on your screen really easy.  If you press the Windows key, then the left arrow, the current window will dock to the left side of the screen.  WIN+right arrow will dock to the right, WIN+up arrow will maximize the window, WIN+down arrow will restore the window.  In addition to the WIN shortcuts, you can drag windows to the top to maximize it (double clicking the title bar still works too), or you can drag the window to the left or right to dock the window there.

On a related note, in a multi monitor setup, you can move windows from one screen to the other using WIN+SHIFT+right or left arrow.  Now were talking!

2) Get rid of the noise – Have you ever been working on a document and been annoyed that all of you other open windows are just in the way?  Press WIN-Home in Windows 7 and all windows but the current are minimized.  Press WIN-Home again to restore the windows.

3) Browser load times – This is really an IE8 tip, but I’ll include it here.  If IE is taking a long time to load, it may be because of the add-ons you are running.  Go to Tools/Manage Add Ons and you will see  a list of what IE loads at startup.  The neat thing is if you scroll to the right in the list, you can see the load times for the Add Ons.  This is a great way to see where the bottle necks are.

4) Quick start for taskbar apps – you can use WIN+1, 2, 3, 4 or 5 to quickly go to or start any of the first 5 apps in your taskbar.

5) Look at the desktop – Another helpful feature is WIN-space bar.  This combo lets you look at the desktop and see any icons or widgets you have.  You can also click on the rectangle all the way in the lower right hand corner – this is the old “show desktop” icon.

6) Additional instance of an open application – there are a couple of ways to do this, but by far the fastest is to hold the shift key while left clicking on the taskbar icon.  Way better than going through the start menu again, or right clicking and choosing to open the app.

7) Running with elevated rights.  If you hold CTL-Shift while clicking on a taskbar app, you will bring up a new instance with full administrator rights (assuming your account has permissions).  When Windows 7 is deployed in an enterprise, this will be GREAT.

8) Specialized Window switching – this one I love.  If you are like me, you have tons of windows open all the time.  In XP if you want to switch between windows you can ALT-Tab through them all, or you can click on the taskbar icon and guess which window is the one you want.  In Windows 7, you can essentially Alt-Tab through all of the open windows associated with a specific application without scrolling through every open window.  You do this by holding down the CTL key, then clicking on the taskbar icon for the application you want.  Windows will “scroll” through the open windows as you click the icon.  This is great if you want to scroll through all of your open Outlook windows, for example, but don’t want to run through everything you have open.

9) Move focus the taskbar – this is neat keyboard shortcut.  If you press WIN-T you will move focus to the taskbar.  You can then use the arrow keys to move through your taskbar apps to choose the one you want.  For keyboard shortcut junkies, this is great.

10) Open windows explorer keyboard shortcut – Press WIN+E.  This will open up and explorer window at the Computer Node.  Note that SHFT+click on the explorer icon opens at the Document Library Node.

More to come –

Tags: ,

Growl for Windows

Posted by Andy on July 25, 2009
Cool Tech, Windows / 1 Comment

Growl v2.0 beta 18 was recently released for Windows – should you care?  If you are like most people, it is getting harder and harder to keep up with everything happening around you on the web.  Twitter, facebook, email, calendar, IM – the draws on your attention are almost overwhelming.  Wouldn’t it be great is there were some tools out there to help with all the noise?  The ability to be automatically notified when things happen would be really useful – enter Growl for Windows.

What is Growl?  In their own words:

Put simply, Growl lets you know when things happen. Files finished downloading, friends came online, new email has arrived – Growl can let you know when any event occurs with a subtle notification. The rest of the time, Growl stays out of your way.

Along with letting you know when things happen, Growl also gives you full control over how you are notified and what action (if any) you want to take in response to the notification. You can choose to be alerted with a visual indicator or an audible alert, both, or neither. You can choose the type of display that is shown, whether the display remains on the screen, the importance of the notification, and even if the notification should be forwarded to another computer. You can have notifications that trigger an email, run a script, launch a program, or are read out loud.

Growl has been available as a MAC application for some time now, so their foray into Windows land is a welcome addition to help you manage your machine. All of you have Windows Update on, right?  Well now you have a tool that you can configure to notify you and/or take action on lots of other things on your machine.

How does it work?  The setup is somewhat manual, but this is a good thing, since the whole point is that Growl is unobtrusive.  Once you install the application, the software sits in your system tray waiting to be told what to do.  You download pluggins from the Growl site for the applications you want.  There are tons of apps there – Firefox, iTunes, Outlook, Gmail, even a system monitor.  You run the setup for the app you want and let Growl do the rest.  What you get is a configurable pop up window for whatever application you choose.

You get configurable reminders for things as they happen – new emails, calendar appointments, what the tune you are playing on iTunes is (they have Pandora too).  New apps are being added all the time, and there is a GNTP library and command line tools that you can use to work with almost any API.

Neat stuff.  Not perfect, but I like it so far.


Tags: ,

Firefox keyword search default

Posted by Andy on July 10, 2009
Tech Tips, Windows / 1 Comment

Nothing gets my blood boiling faster than legitimate software that acts like malware.  Anything you install should, before it changes ANY settings, tell you what it wants to change and ask you if that’s what you want to do.   The default browser, for example, is a setting that used to get hijacked all the time by Microsoft until enough people complained about it.  I remember happily running Netscape (stop it, I’m old) then installing the latest IE and low an behold, my default browser changed without my asking for it.  Now most browsers will notify you if someone tries to change the default setting so that you are not surreptitiously redirected without your approval.

Search providers are not so nice.

Ask.com, for example, has decided it is ok to change the default keyword search provider in Firefox without asking or notifying the user.  What makes this especially annoying is that it is not a setting easily found or changed without some digging.  What is the default keyword search provider?  If you type a word into the URL window instead of a web address, most browsers assume you want to search for that word and will use a search engine to look it up.  This is called a keyword search.  The search engine your browser uses for this task is the keyword search provider.  If you don’t specify one, the browser uses the ISP’s default, which is why you can sometimes get an Optimum Online search page, or Roadrunner search page if you don’t tell the browser what you want to use – a entirely different level of annoying ;)  Not all browser’s let you make this setting, so it is very helpful to use one that does, like Firefox.

So, back to the problem – how do you change Firefox’s default keyword search provider back to something that works from Ask.com’s “search” engine?

First, you have to get to the advanced options page for Firefox’s defaults.  These settings are accessible from the about:config page, and are stored in a file called prefs.js.  In the URL entry bar, enter about:config to bring up the settings page.   CAUTION – these are advanced settings and messing with them can make your browser do things you don’t expect.  Be careful changing things!  It’s a good idea to write down what you change, or better yet, make a backup of the underlying settings file (for Vista/Windows 7, the file is here C:\Users\username\AppData\Roaming\Mozilla\Firefox\Profiles\profileID.default\prefs.js).

Second, use the filter to search for “keyword”.  You should see the keyword.URL entry – this is the one you want to change.  It looks like this:

keyworddefault

Next, double click on the keyword.URL line to bring up a dialogue box into which you can enter the search engine of your choice.

Lastly, enter the URL you want.  For Google, use "http://www.google.com/search?ie=UTF-8&oe=utf-8&q=". There are a couple of other examples here.

That’s it –

Tags: , , , ,

How do I find my Windows Product key?

Posted by Andy on May 31, 2009
Tech Tips, Windows / Comments Off on How do I find my Windows Product key?

Another issue I come across now and again is finding the windows product key for a client who doesn’t have the original software his machine came with.  In many cases, the OS product key is on the Microsoft label right on the machine, but if you need the Office product key, or if the product label on the machine is illegible and you have to rebuild, what do you do?

The Product Key is not stored in an obvious place in the registry, but there are utilities that will find the key for you.  Magic Jelly Bean Keyfinder is a great little utility that is just the ticket.  Quick and painless, it will give you the OS key and the Office key.

There are others out there, but since this is a touchy area in terms of software piracy, many of the tools are laden with viruses – be careful!!